
This article is going to be detailed documentation guide for our theme “Masonry Blog”.
Do kindly activate “perfectwpthemes toolkit” plugin if you are using Masonry Blog. If you have dismissed recommend plugins prompt message from your dashboard before installing “perfect themes toolkit“, you can install this plugin manually too.
If you are already using another theme and switching to Masonry Blog then, we suggest you to install and activate Regenerate thumbnails plugin. Click here to download this plugin.
After activating it, go to Dashboard > Tools > Force Regenerate Thumbnails and click on Regenerate All Thumbnails.
Installing Masonry Blog
There are two ways to install the theme. They are as follows:
VIA WORDPRESS DASHBOARD
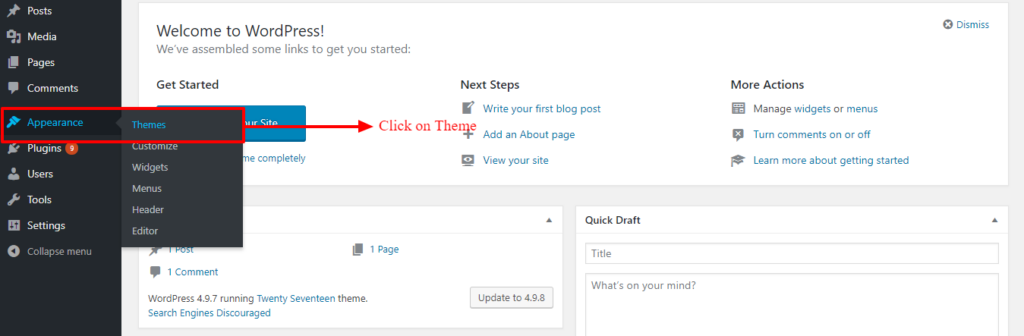
- Navigate to Appearance > Themes.
- Click on Add New button.
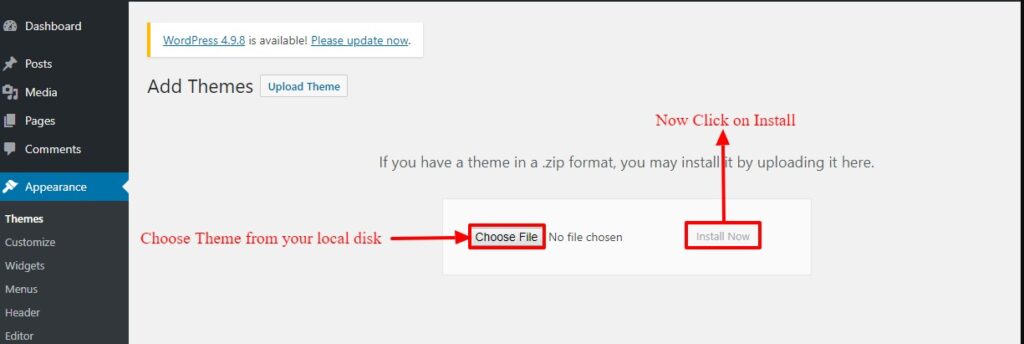
- Click on Upload Theme button.
- Upload the theme file with .zip file format and click on Install Now button.
- After theme installation activate the theme.
VIA FTP
- Login to your FTP client application.
- Navigate to the WordPress installation folder.
- Navigate to wp-content > themes folder.
- Upload the theme folder into themes folder of server.
- Login to your site’s Dashboard.
- Navigate to Appearance > Themes.
- Activate the theme.
For MAC users when you download a theme file make sure it does not unzip when you click the file. You are supposed to upload the .zip file itself.Demo Import
You can set up your site by importing demo contents. For this, you must install Perfectwpthemes Toolkit plugin. Once you’ve installed the plugin, follow the steps mentioned below to import demo contents:
- Navigate to Appearance > Import Demo Content
- You’ll see the lists of demos. Click on Live Preview to see the demo.
- Click on Import Demo button to import demo contents of selected demo.
Notes: After importing demo contents, check your site to see if any sections or contents are missing. If there are contents and sections missing, then you’ve to configure it manually. See for the detailed information about missing contents and sections in this documentation
Setting Reading Screen
Most of the time we have felt that beginner WordPress users get confused with the static front page & latest posts setting under Dashboard > setting > Reading.
- The static front page allows setting any particular page as a homepage.
- Latest posts setting will display your blog posts on the homepage.
Here, since masonry blog is a blog theme so you should be using setting Latest post. We have attached a figure to help you with this.
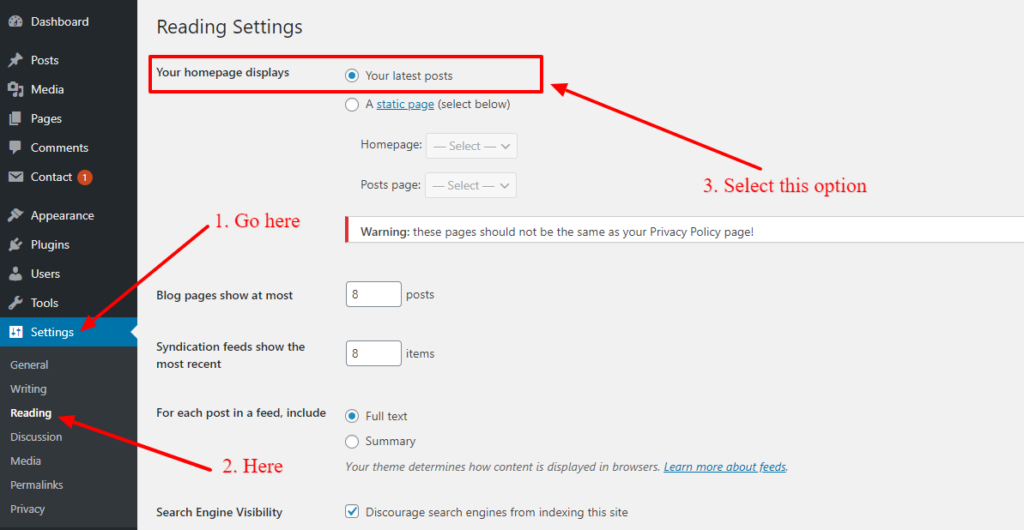
If you need more information in setting reading screen please visit here https://wordpress.org/support/article/settings-reading-screen/
Customizer
We hope you are familiar with WordPress customizer. All the options of Masonry Blog can be found at Customizer.
You can access Customizer from Dashboard > Appearances > Customizer
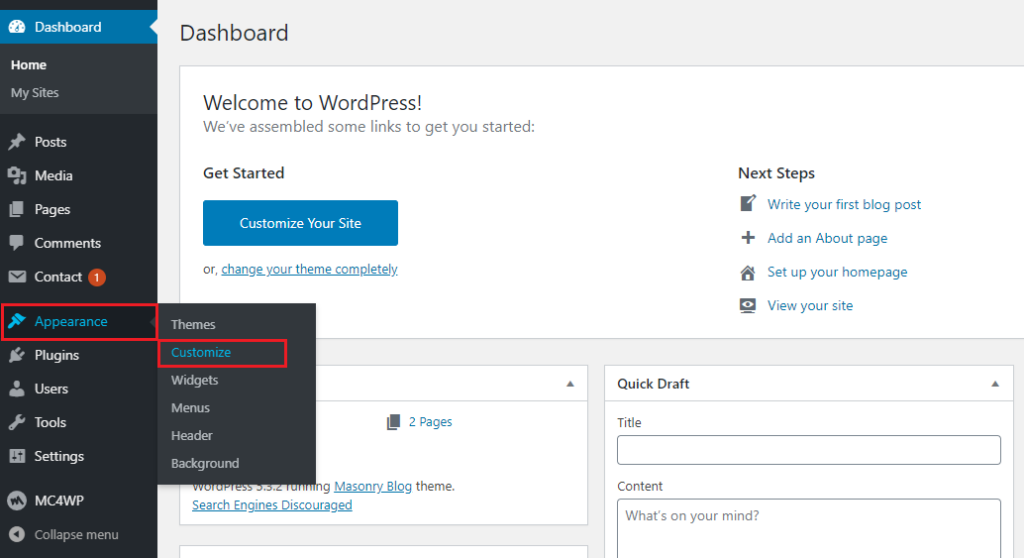
Masonry blog has it’s all options & settings at customizer.
Site Header
Option to configure header settings are located at Dashboard > customizer > Site Header.
You will find the option to change the logo, favicon, top header setting, header image at the site header.
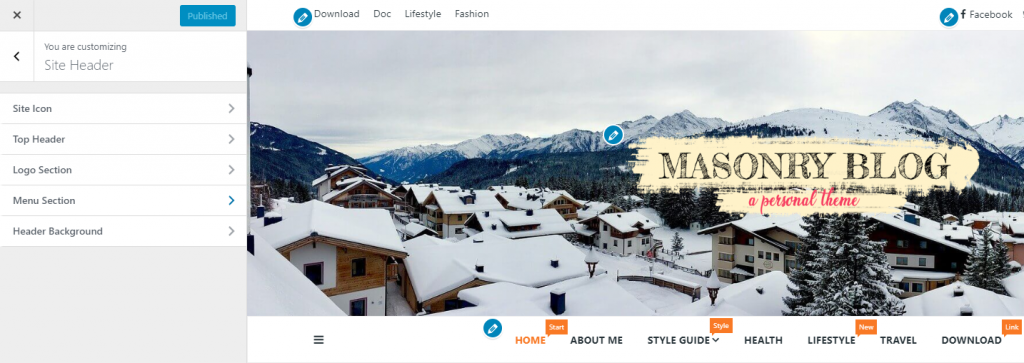
CONFIGURE LOGO
- To manage Site Logo, navigate to Appearance > Customize > Site Header > Logo section
- There you’ll find different options which are as below: Logo Setup: Under this section, you’ll find options to set Logo, Site Title, Tagline, hide or display both Site Title and Tagline.
- You can even change the font family for the site title.
CONFIGURE FAVICON
- To manage Site Favicon, navigate to Appearance > Customize > Site Header > Site icon.
- Set your site’s favicon and click on Publish button to save.
MANAGE TOP HEADER
In order to manage settings for top header follow the instruction below.
- Navigate to Dashboard > Customizer > Site header > top header
- You will find option to enable or disable the top header.
The secondary menu at header top can be managed from Dashboard > Appearances > Menus. Make sure you choose menu location
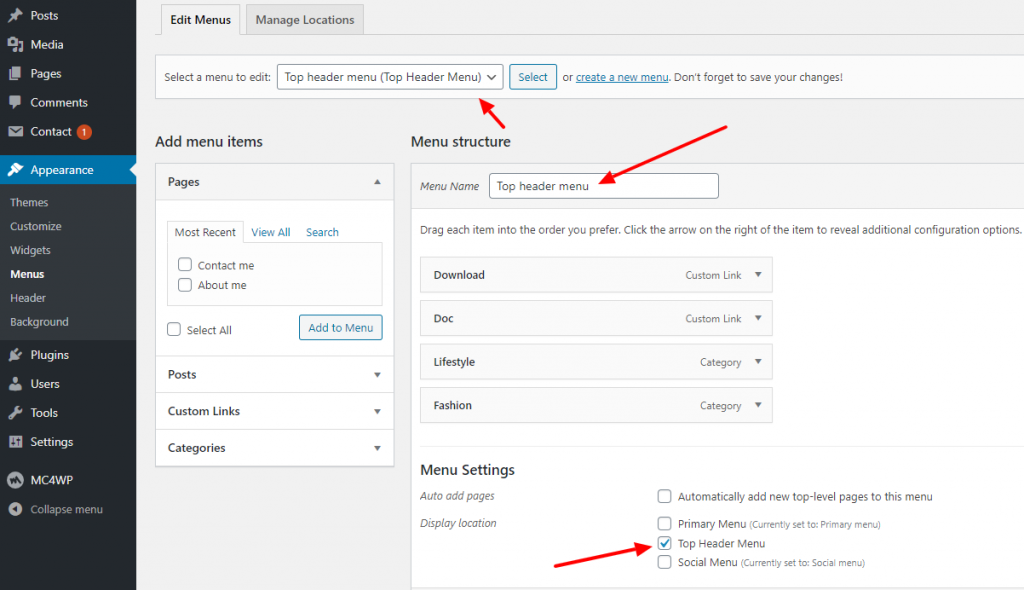
Note: Header top menu does not support drop-down items.
Similarly, Social links are also menu items. In order to show your social links at the header top follow the instructions below.
- Navigate to Dashboard > Appearances > Menu
- Create a menu with the name example: Header top social menu
- Select to use custom menu links & enter your social media profile link
- Add the menu item
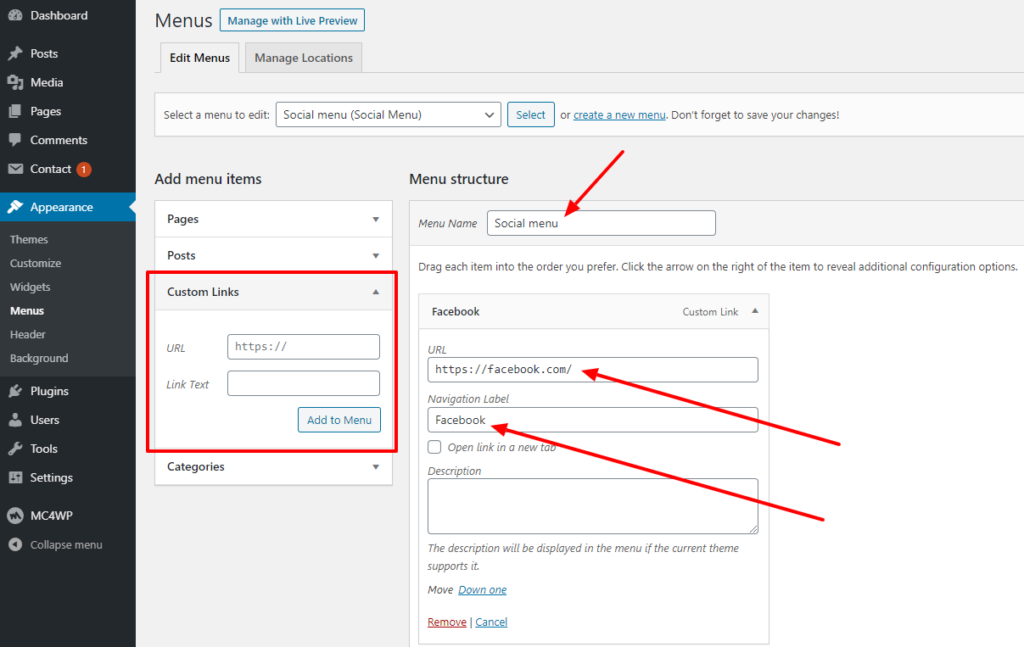
- Make sure you choose the menu location to “Social menu”
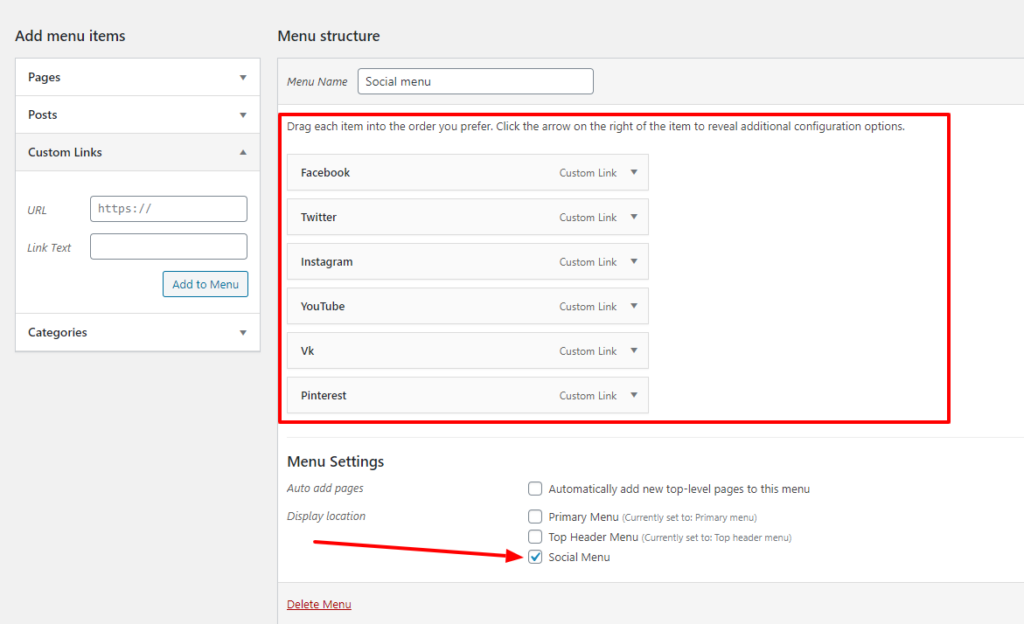
Note: Following are the supported social links menu icons.
- Vk
- Linked-in
- YouTube
- Vimeo
- Vine
- Tumblr
- Digg
- Dribble
- Flickr
- Quora
- Medium
- Behance
- RSS feed (https://yourdomain.com/feeds/)
Site Pages
In order to change option for site pages & pagination navigate to Dashboard > Customizer > Site pages
Site pages include option for different pages like blog page, archive/category page, search page, post single, page single & Pagination
Site Carousel
Site carousel is also called a banner slider. Site carousel section is displayed below the header. To configure the carousel section, follow the instructions below:
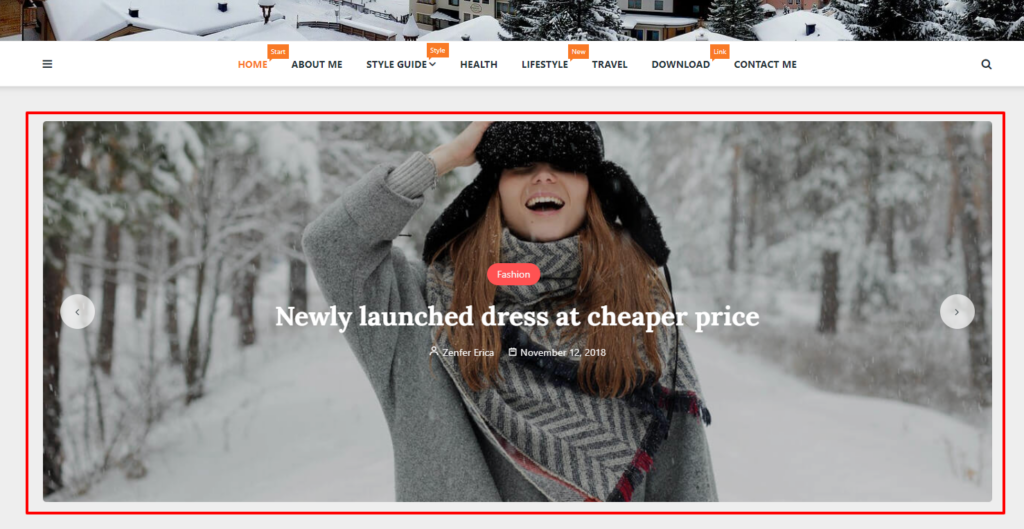
- Navigate to Dashboard > Appearances > Customizer > Site Carousel
- Enable to show site carousel
- Select category
Note: Site carousel can be used to display your post in the slider. Since site carousel is not a static banner image all the featured image appearing at site carousel are featured image for the posts.
Footer & Copyright information
You can change footer copyright information from Dashboard > Appearances > Site Footer.
Note: Text Masonry Blog, WordPress theme by Perfectwpthemes is visible in the free version. If you would like to remove that please do kindly consider buying Masonry blog pro addon plugin.
Subscription/Newsletter
Masonry blog theme support all plugins that are built for subscription & newsletter purpose. However, we have styled MailChimp & Mailpoet newsletter to make it look better in Masonry Blog theme.
Please do kindly follow the instruction below to display newsletter section in homepage above the footer, archive page, search page, blog single & page single.
- Create a newsletter form respective newsletter plugin
- Copy the shortcode provided by newsletter plugin
- Navigate to Dashboard > Appearances > Customizer > Subscription / Newsletter
- Paste the shortcode
- Click save
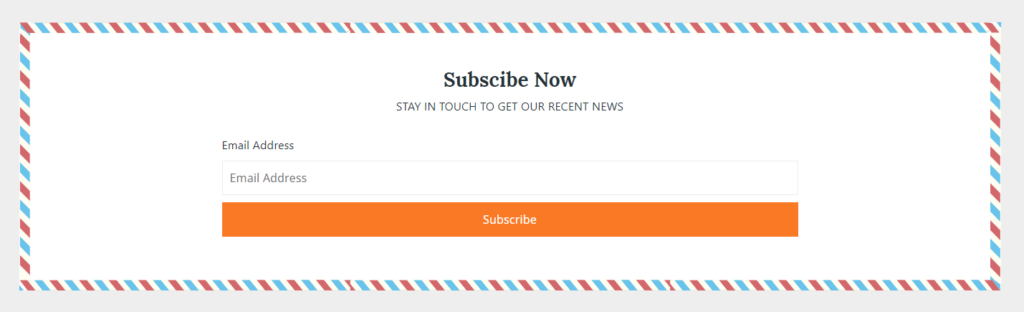
Mailpoet does not allow to write custom HTML markup. However, MailChimp allows custom HTML markup while creating newsletter forms. We have 3 markup styles of MailChimp newsletter & they as below.
LAYOUT ONE HTML MARKUP
<div class="subscription-heading">
  <p>
    STAY IN TOUCH TO GET OUR RECENT NEWS
  </p>
  <p class="subscription-heading-title">
    Subscibe Now
  </p>
</div>
<p>
    <label>Email Address</label>
    <input type="email" name="EMAIL" placeholder="Email Address" required="">
</p>
<p>
    <input type="submit" value="Subscribe">
</p>
LAYOUT TWO HTML MARKUP
  <div class="subscription-heading">
  <p>
    STAY IN TOUCH TO GET OUR RECENT NEWS
  </p>
  <p class="subscription-heading-title">
    Subscibe Now
  </p>
</div>

<div class="subscription-form-container subscription-form-layout-one">
  <input type="email" name="EMAIL" placeholder="Email Address" required="">
  <input type="submit" value="Subscribe">
</div>
LAYOUT THREE HTML MARKUP
 <div class="subscription-heading">
  <p>
    STAY IN TOUCH TO GET OUR RECENT NEWS
  </p>
  <p class="subscription-heading-title">
    Subscibe Now
  </p>
</div>

<div class="subscription-form-container subscription-form-layout-two">
  <input type="email" name="EMAIL" placeholder="Email Address" required="">
  <input type="submit" value="Subscribe">
</div>
You can simply copy & paste above any HTML markup to build a newsletter form in MailChimp. Make sure to use just one layout HTML markup.
Widgets & Widget Areas
In simple words, widgets are the design elements or sections which can be used to build a website.
Masonry Blog has a few widgets that are vital while building a blog website. You can access widgets from Dashboard > Appearances > Widget
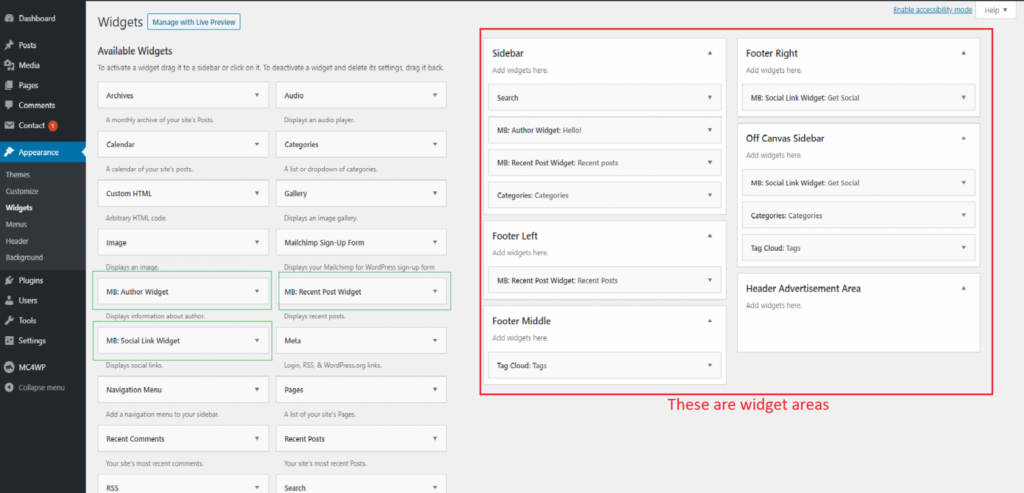
When it comes to widget there are two different things that we need to understand & they are as follows:
- Widget: Again, In simple word widget are sections or design elements.
- Widget area: Widget area is a place where we place the widgets.
Talking about widget & widget areas in Masonry Blog, the theme is built with 3 essential widgets & 6 widget areas
Following are the widget available in Masonry Blog
MB: AUTHOR WIDGET
Mb: Author widget helps to display a short introduction about blog author along with his/her picture & social profiles.
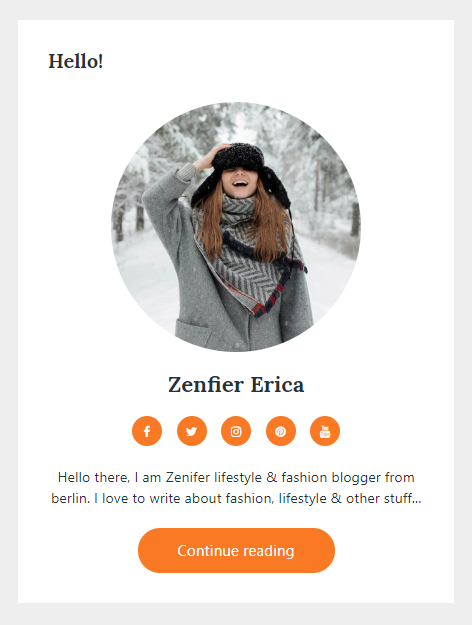
Mb: Author widget can be placed at sidebar, off-canvas sidebar, footer widget areas.
MB: RECENT POSTS
Mb: recent posts widget is a simple widget which displays recent posts just like its name.
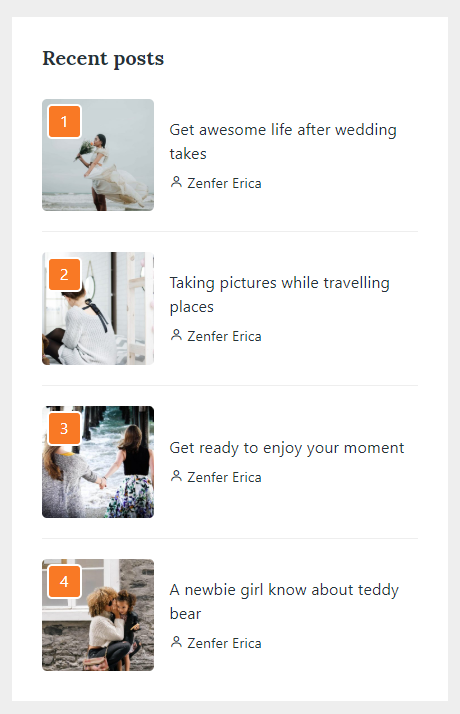
You can place this widget at sidebar, off-canvas sidebar, footer widget areas.
MB: SOCIAL LINK WIDGET
Mb: Social link widget helps you share your social profiles with your blog readers. We do have 2 layouts for this widget.
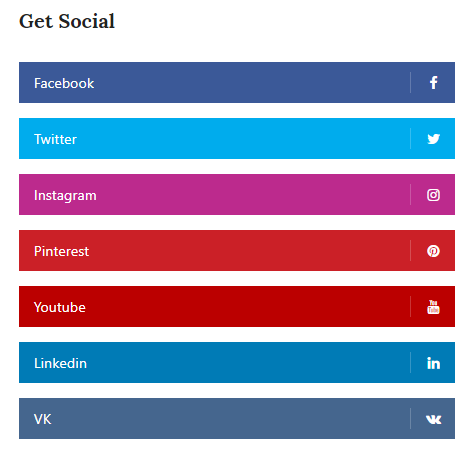
You can place this widget at sidebar, off-canvas sidebar, footer widget areas.
Questions
If you have questions & queries that are not coved by documentation guide you can contact us anytime.